스레드 (1)
- 개념 정의
- 파이썬 스레드
- 데몬 스레드
- fork, join
개념 정의
- 운영체제는 동시에 실행되는 여러 프로그램들을 잘 관리해야한느데 이런 작업을 스케줄링 이라함
- 스케줄의 단위는 스레드인데, 프로그램은 여러개의 스레드를 사용할 수 있는데, 이를 멀티 스레드라고 함
- 스레드
- 프로세스의 실행 단위
- 프로세스
- 프로그램이 메모리에 올라가서 실행 중인 것을 말함
파이썬 스레드
- thread, threading 모듈이 있음 <-- threding 모듈을 더 많이 사용함
- GUI 라이브러리인 QThread 도 있음
- run 메소드
- start 함수 실행하면 클래스 안에 run 함수가 호출됨
- start 메소드
- 쓰레드 실행하는 함수
- join 메소드
- 쓰레드가 종료될 때까지 대기함
import threading
import time


# thread 직접 사용
def t_Thread(num1, num2):
    for i in range(5):
        print(f'thread : {i}')
        time.sleep(1)

t = threading.Thread(target=t_Thread, args=(1, 10))   # target=thread func name, args=(num1, num2)
t.start()
print('Main Thread')


# class 사용
class Worker(threading.Thread):
    def __init__(self, num):
        super().__init__()
        self.num = num

    def run(self):
        for i in range(self.num):
            print(f'sub thread start {i}\n')
            time.sleep(1)


if __name__ == '__main__':

    print('main thread start')

    t = Worker(5)                        # thread 생성
    t.daemon = True                     # 데몬 스레드 실행 --> 프
    t.start()                           # sub thread run() 호출됨

    print('main thread end ')
데몬 스레드
- 데몬 속성 - 서브 쓰레드가 데몬 쓰레드인지 아닌지를 지정하는 것 (디폴트 False)
- 데몬 스레드 - 백그라운드에서 실행되는 스레드로 메인 쓰레드가 종료되면 즉시 종료되는 스레드
- 데몬 스레드가 아니면 해당 서브 쓰레드는 메인 스레드가 종료되도 자기 작업이 끝날때까지 지속됨
- GUI 라이브러리인 QThread 도 있음
# 데몬 스레드(daemon thread)

import threading
import time

def count(num, t, thread_num):
    print(f'thread {thread_num} start')

    for i in range(num):
        print(f'thread {thread_num} running {i}')
        time.sleep(t)

    print(f'thread {thread_num} ends')

thread_1 = threading.Thread(target=count, args=(10, 0.5, 1))
thread_1.daemon = True  # default : False
thread_1.start()

count(5, 0.5, 2)
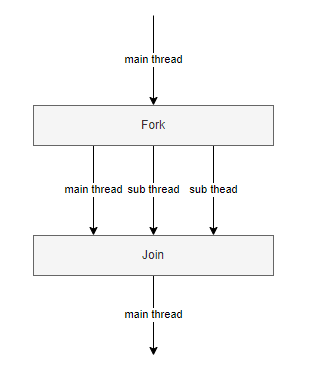
Fork, Join 함수
- Fork
- 메인 스레드가 서브 스레드를 생성하는 것
- 두개의 서브 스레드를 생성하는 경우, 메인스레드를 포함하여 총 3개의 스레드가 스케줄링 됨
- Join
- join 은 모든 스레드가 작업을 마칠때 까지 기다리는 것을 의미함.
- 데이터를 여러 스레드를 통해서 별렬로 처리한 후 그 값들을 다시 모아서 순차적으로 처리해야 할 필요가 있을때, 분할한 데이터가 모든 스레드에서 처리 될 때까지 기다렸다가 메인 스레드가 다시 추후 작업을 하는 경우에 사용
- 부모 스레드, 즉, 해당 스레드를 생성한 스레드를 진행하지 않고, 자식 스레드 즉 새로 생성한 스레드의 종료를 기다려 준다는 의미
- 스레드가 끝날때 까지 기다려 주는 함수
import threading
import time


class Worker(threading.Thread):
    def __init__(self, name):
        super().__init__()
        self.name = name    # thread 이름 지정

    def run(self):
        print('sub thread start', threading.current_thread().getName())
        time.sleep(5)
        print('sub thread start', threading.current_thread().getName())


print('main thread start')

t1 = Worker('1')    # sub thread 생성
t1.start()          # sub thread run method 호출

t2 = Worker('2')    # sub thread 생성
t2.start()          # sub thread run method 호출

t1.join()
t2.join()

print('main thread post job')
print('main thread end')


"""
# thread 여러개 생성
print('main thread start')

threads = []
for i in range(3):
	thread = Worker(i)
    thread.start()
    threads.append(thread)


for thread in threads:
	thread.join()

print('main thread post job')
print('main thread end')

"""
reference
02) 파이썬 스레드
[TOC] ## 프로세스와 스레드 운영체제에서 어떤 실행 프로그램이 실행된다는 것은 CPU, 메모리, SSD와 같은 컴퓨터 자원을 사용합니다. 따라서 운영체체제는 프로그램들이…
wikidocs.net
Python Thread 예제
파이썬에서 스레드를 사용하는 방법을 다루고 있습니다. 1. 쓰레드 (Thread) 2. 스레드 생성 및 실행 3. join 함수 4. 데몬 쓰레드 5. Concurrent.futures 모듈 6. 전역 변수 공유 7. GIL(Global Interpreter Lock) 8. 프
webnautes.tistory.com
[edu] thread start/join (스레드 시작, 조인, start, join)
프로그램을 작성하다 보면 동시성이 필요하게 될때가 있다. 즉 여러가지 일을 동시에 진행해야 한다. os 에서 프로세스마다 리소스를 할당해서 여러 프로세스가 동시에 실행되는데 하나의 프로
burningrizen.tistory.com
'Python' 카테고리의 다른 글
| [ Thread ] 스레드 (3) - Lock() (0) | 2022.12.16 |
|---|---|
| [ Thread ] 스레드 (2) - 멀티 스레드 (0) | 2022.12.15 |
| [Socket] 소켓(Socket) 프로그래밍 (1) (1) | 2022.09.21 |
| [Python] enumerate 함수 (0) | 2022.01.26 |
| [Python] Zip 함수 (0) | 2022.01.26 |